By Matthew Bertram — For Rattling Chains
In disc golf’s infancy, simplicity reigned supreme. You took your one disc, carried it in your hand, and played your round.
With the evolution of the game, though, has come a plethora of discs to cater your game to a tee — meaning that, more often than not, two hands aren’t even enough to carry everything.

What once was an Under Armour backpack is now a disc golf bag, thanks to some intrepid DIY spirit. (photo by Matthew Bertram)
Now, disc golf bags are undergoing a similar evolution, moving away from the standard bag-plus-quad straps to more backpack-style bags being available on the marketplace. Players, it seems, are starting to re-think how they carry their gear.
Backpacks are designed to offer better weight distribution by keeping the bulk of your disc weight high and tight to the body. Aside from the comfort aspect, they also tend to offer superior storage capacity. Whether the backpack is best for you is a personal decision, but what you can’t argue is the price — manufacturers of backpack bags demand a premium for the comfort and style they offer. Today, the industry standard for these bags is right around $200.00, and can climb near $300.00.
With the backpack market continuing to grow in 2013, more options will be available to disc golfers. If dropping $200.00 on a bag is of no concern to you, or if you find a backpack that gives you everything you’ve been looking for, then you’re making the right choice. These bags are designed for disc golfers by disc golfers. That fact should not be understated.
However, if you’d rather spend more money on discs or tournament entry fees, there is another path you might take – the do-it-yourself route.
The DIY contingent was once just as niche as the ones who carried true disc golf backpacks. But, as the backpack market grows, so do the amount of players who want more fiscally viable options – myself included. I’ve been tinkering and converting non-DG bags for a couple years now, and what I enjoy is being able to build something that is unique and functional out of a bag that had an entirely different purpose to begin with. My hope is that this article can offer some tips and tricks that I’ve learned (mostly by wasting money), so that you may be able to avoid the pitfalls and reap the benefits of creating your own disc golf backpack.
Bag styles
The first thing anyone must understand is that a backpack that carries discs has some very finite requirements. Whenever a new disc golf backpack is released, there is inevitably a flood of, “Man, it looks just like a _____,” which I feel is an unfair assessment to make.
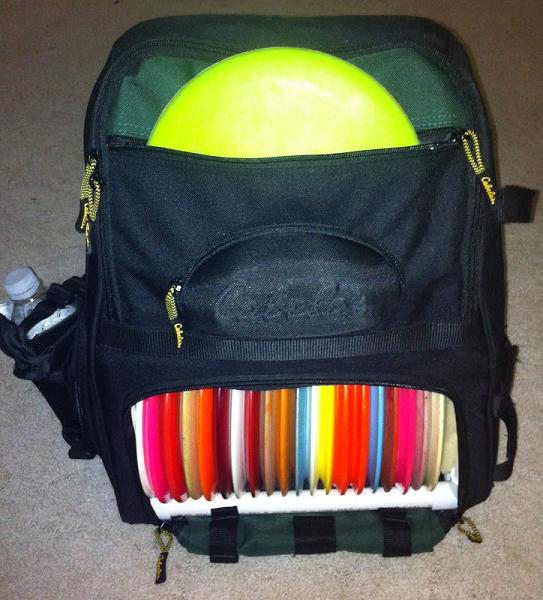
The Cabela’s XPG fishing backpack is popular among the disc golf DIY set. (photo by Matthew Bertram)
When you’re talking about carrying 20 or more discs, plus all of the required gear that disc golfers carry, there is a limit to creating a unique style while still maintaining function.
There are essentially four “styles” of disc golf backpacks offered today, but they effectively all do the same thing in the end. They are just organized differently to appeal to different players. I’m going to “name” them for the purpose of simplicity, but it’s not because of any preference to a certain bag. They include:
- Grip style (Grip EQ Large Tour Bag, Prodiscus Jet Pack, Voodoo Spinal Tap) bags, which drop the discs down into the main compartment, have good side pocket storage, and include a putter “quiver” up top that can also double as minimal storage.
- Revo style (Revolution Dual Pack, Hyzer Bomb Flak, Physical Flight Contender), which are characterized by discs being forward loaded into a lower compartment, a large upper compartment for storage, and minimal side pocket storage.
- Mahal style (Mystery Ranch Golf Mahal, Gateway Ozark), which is essentially a traditional disc golf bag designed with a full backpack back for comfort.
- Vertical style (Big Hyzer Ergo, Upper Park Shift), which orients the disc storage along the spine. I have owned the Shift backpack, and I am intrigued with the vertical disc concept, but it’s still relatively new and unknown as far as functionality.
When you’re trying to find a suitable bag to convert for disc golf, you need to establish what you’re aiming to accomplish – or, rather, which style you are trying to emulate. Decide which style of disc golf backpack best fits your needs. For instance, the flagship DIY bag is the Cabela’s XPG Pro Series Angler backpack, and for good reason. This bag is easily adapted into a Revo-style backpack. The discs are front loaded into a lower compartment and the upper compartment is available for storage.
Choosing the right bag
There are three things I always take into account when finding a new bag to convert – price, durability, and adaptability.
The first is obvious. We convert these bags to save money. If you’re finding non-DG backpacks for $100.00 or more, you’re starting to defeat the purpose.
The second feature is also important. Yes, you can find $20.00 backpacks made with cheap nylon, but more than likely they wouldn’t last a season of hard rounds. However, we also aren’t likely to find bags made of heavy duty Cordura or ballistic nylon, as bags made with these tend to fall out of a reasonable price range. Sometimes the biggest challenge is finding that bag that is built well but isn’t too pricey.
The third qualification is the toughest to determine. Without having the bag in your hands, sometimes it is impossible to tell how well it would serve as a disc golf bag. It’s helpful to keep a few specifications in mind when trying to see if a bag will convert well:
- Is the depth of the bag at least nine inches? This is the most important aspect. Anytime that I’m asked about a bag, this is the first thing I check. Bags need a minimum depth of 9 inches for discs to comfortably store side-to-side. Otherwise, you’re risking the discs falling out the front, or bulging against the back uncomfortably. An example is the Spiderwire Utility Box Backpack. On the surface, it’s very similar to the Cabela’s backpack. However, the bag only has an internal depth of seven inches. So almost two full inches of the disc would be hanging out the front. Because discs are round, it would still be possible to build a frame allowing the discs to poke out, but it would be less than ideal.
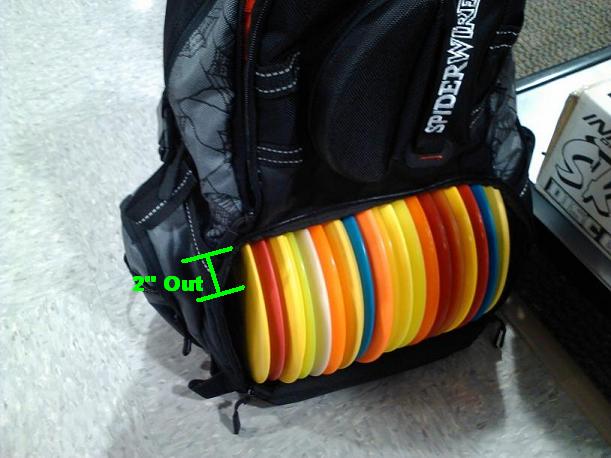
One needs to make sure the dimensions of a backpack are right before designing your own. (photo by Matthew Bertram)
- How accessible is the main compartment? This is why tackle backpacks are popular – they are designed to allow access to big tackle boxes, so discs are usually no problem. Backpacks that open like an average Jansport school backpack, on the other hand, are not going to make the discs easy to get to. Look for bags with wide openings, lower compartments, or a single large main compartment.
- What additional features are included? Things like extra pockets, key clips, and pencil holders go a long way. Front pockets that are also at least nine inches wide work well as putter pockets. You can even go further and find bags with rainflys, sternum straps, and rubberized bottoms. It all depends on which features work best for your playing situation.
I currently use two DIY bags, depending on my playing needs. My smaller bag is a FuL Brickhouse sling. It is a single-strap sling bag that fits 10-12 discs loaded front-to-back. Even though it’s not near nine inches in depth, I wanted a smaller bag for lighter rounds. So keep in mind that option is there as well.
Framing it out
Once you’ve found your bag, the next step is your frame. This is the fun part. All disc golf bags have some form of framework, even if it’s just a plastic plate at the bottom of the bag.
Simply dropping 20 discs into a bag will probably not end well, so repeat this mantra — “PVC is my friend.” Depending on your bag, PVC piping is most likely going to be the core of any frame you make. It’s light, it’s waterproof, it can make any size frame you need, and it’s strong.
Building your frame is extremely important. (photo by Matthew Bertram)
I’m also a fan of Plexiglas and corrugated plastic for thinner options when needed. Basically, you’ll need to decide what is going to work best for you and get your hands dirty. Luckily, PVC is cheap. So if you mess it up, you’re not going broke doing it.
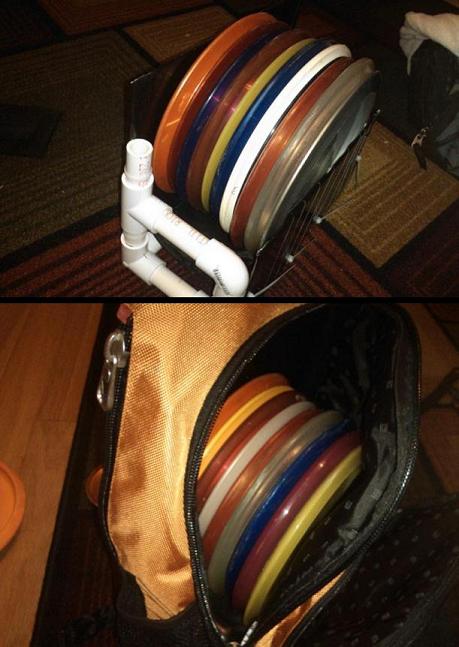
A good example is my sling bag. Since I was working with a smaller internal space to begin with, I needed as much front-to-back room as possible. Instead of making a full box frame from PVC, I only created the sides and bottom.
The front and back panels are nothing more than pieces of a corrugated plastic “For Sale” sign that I bought at Wal-Mart and spray painted black. This gave me the stability of the PVC and allowed the front back to do nothing more than hold the discs in.

Here is a Cabela’s bag built with a frame that lifts the discs up into a top-load orientation, allowing the bottom compartment to be used for storage. (photo by Matthew Bertram)
On the other hand, my bigger backpack is an Under Armour Innovate backpack that has nothing more than a few Plexiglas plates on the bottom and sides that hold in a U-channel disc divider.
So every bag is going to have different needs depending on its initial stability. I have seen people use the Cabela’s backpack without any frame at all. However, even if no frame is “possible,” I still believe a frame makes any bag better. How you make your frame can also drastically change the functionality of the bag.
Helpful hints
This honestly just scratches the surface of the “Do-it-yourself” possibilities. I could go on for pages more, but I won’t, because half the enjoyment of converting a bag is, well, doing it yourself. But if you’re looking for a place to start, here are some ideas to get you going:
- Fishing and tackle backpacks are the most popular. If you go this route, look for bags that use 3700-sized tackle boxes, as they are roughly nine inches deep. Tackle backpacks that use 3600-sized boxes are only about seven inches deep.
- Gym or sports backpacks can be good because they usually have large main compartments. They also tend to have good organization of extra storage because they are designed to carry all your everyday needs to the gym. Backpacks designed specifically for a sport (lacrosse, batting, hockey, etc.) are also interesting options and can be made into unique conversions.
- Hiking and outdoor backpacks are durable. Along with the fishing bags, these are likely to be made from the toughest material. Look for more unique styles, or niche outdoor backpacks. For example, a backpack designed to carry a chainsaw could offer a big, sizeable compartment that is easily accessible and still have smaller storage areas to work with.
- Try to stay away from laptop backpacks. The internal depth can be misleading because a couple inches are set aside for the laptop compartment. A lot of them also rely on multiple smaller compartments to organize a student’s needs instead of offering large compartments.
Keep in mind, companies release new backpack models each year. That can be both a pro and a con. It’s difficult because bags that work so well for us can go out of production, like the Cabela’s XPG or the Under Armour Innovate, and they become hard to find. But it also allows for new options to become available all the time. So be sure to keep an eye out for new possibilities. Save money, have fun, and be unique on the course. How can that be bad?
If you have any comments, questions, thoughts, ideas or anything else, feel free to e-mail us at: pj@rattlingchains.com. Don’t forget to follow us on Twitter andlike us on Facebook!

I am going to be travelling a lot soon and fitting all my discs into my suitcase seems like a bit of hassle, so I wanted a bag that fit my go to discs, similar to a nutsac but $36 for a bag that fits 6 discs seems like a lot. I found this http://www.amazon.com/Rothco-O-D-Ammo-Shoulder-Bag/dp/B0013O579G/ref=sr_1_1?ie=UTF8&qid=1365784113&sr=8-1&keywords=ammo+bag
I purchased the bag originally as a medical tool bag but have found that it works really well as a cheap alternative to a nutsac. It is made of very durable straps and canvas so I know its not going anywhere anytime soon. So for my lighter rounds and travelling its the perfect bag for me.
LikeLike
If I wanted to carry that much plastic, I’d fabricate or buy a cart; either a baby carriage or a ball golf bag carrier. With my back problems, I’m not in the market for a disc golf backpack, so until I fabricate a cart, I just limit myself to ten discs, which will fit in a $15 or $25 Innova bag.
LikeLike
Everyone should know that on the Cabela’s main website the Cabela’s XPG® Pro is sold out due to the large demand with discgolfers. I had a Cabela’s exec find my blog post on my Cabela’s bag and sent me an e-mail on what I had to do to adapt it for DG. He wanted to know how many DG’ers I knew had a Cabela’s backpack and how they were holding up.
I told him how I built the lower section frame, waterproofed the botom, sewed in zipper stops, the top front pocket could be deeper so a putter could fit all the way in and the bag needed insulated side holders for 32oz bottles.Stuff like that.
My impression is that he was doing research in to either modifying the backpack for a Cabela’s DG version or doing it himself and marketing it on his own.
I told him he needed to get with the local DG scene and learn more about the sport and how DG wears and tears on a backpack.
LikeLike
I converted a Bass Pro Shops tackle bag (the Extreme Qualifier 360) into a disc golf bag. The main bottom compartment where my discs are zips away so I can carry it as a single-strap if I don’t need the upper portion that I designated for clothing and water bottles. The bottom is a vinyl of sorts that is water proof, although with the discs in it, I could see the edges getting a little wet. So far I’ve only added a piece of cardboard on the bottom so it stands upright. Plenty of side pocket storage for a couple of towels, a mini, and a utility knife. It holds close to 20 discs plus two putters in the upper pocket.
LikeLike
Another possible option for diy bags is converting a soccer or volleyball sports bag. I have noted that these bags usually have a pocket in the front for soccer/volleyballs with a net that is easily removed, as well as the inner fabric. This gives access to the main disc compartment from the top zipper, as well as a flap for easy access in the front. These bags usually come with many other zippers for storage, such as cleat storage, which can function as a good umbrella holder if a frame is installed. Further changes can be made, but I have been using a very simply modified Adidas soccer bag for sometime now and I have been very happy with how it functions.
LikeLike
I hope you will consider the Gorilla boy Simian as a fifth style. I was disappointed not to see this model mentioned. This is the only one I found with a seat incorporated into the backpack and the original vertical style that occurred before before Big Hyzer and Upper Park. Apart from that, appreciated the read.
LikeLike